AI
10 Steps to Setting Up Your First ChatGPT Ads Campaign (The PPC Pro's Guide)
Are you as excited as I am right now?
Every time a new ad platform launches, it feels like my birthday. You get to play. You get to figure out something nobody fully understands yet, and the marketers who show up early are the ones who build the institutional knowledge before everyone else catches up.
Think about the platforms that have launched in the last 15 years and what early access meant for the advertisers who jumped in:
- Google Ads (AdWords era, early 2000s) — pennies per click before competition drove CPCs into the hundreds
- Facebook Ads (2007) — organic reach was still a thing, and ad costs were a fraction of what they are now
- Instagram Ads (2013) — early adopters built massive audiences before the algorithm got expensive
- YouTube Ads (2006, scaled through 2010s) — video ad inventory at rates that seem laughable now
- Amazon Sponsored Products (2012) — brands that dominated early still own category pages
- LinkedIn Ads (2013, self-serve) — B2B targeting at a fraction of today's CPCs
- TikTok Ads (2019) — brands who showed up before it got crowded built audiences for almost nothing
Every single one of those platforms had a window. A moment where costs were low, competition was thin, and the advertisers willing to learn the new thing got outsized returns. Then the window closed.
Figuring out how to actually use a new platform is half the fun, and half the chaos. There are new terms to learn (Context Hints, anyone?), new creative rules, and a targeting model that doesn't work like anything you've run before.
I was genuinely left wondering where to start when I first opened the platform. So I figured it out, and now I'm sharing it with you so you don't have to spend the time I did piecing it together.
Before You Start: What You Need to Know About the Platform
ChatGPT Ads launched February 9, 2026, and opened to all US advertisers with no minimum spend on May 5, 2026. The platform is self-serve at ads.openai.com and is still in beta — which means specs, features, and policies are moving. We'll flag anything that's still in flux as we go.
A few things that matter before you touch the platform:
Who sees your ads
Only logged-in adults on the Free and Go ($8/month) tiers. Plus, Pro, Business, Enterprise, and Education users never see ads. This has serious implications for B2B campaigns. More on that in Step 4.
How matching works
There are no keywords. Ads are matched to the full semantic context of the live conversation. This is the biggest mindset shift coming from search.
The learning period
The platform needs 2–3 weeks to calibrate. Check in daily to monitor health — impressions serving, spend pacing, no disapprovals — but hold off on any optimization decisions until you have at least three weeks of data.
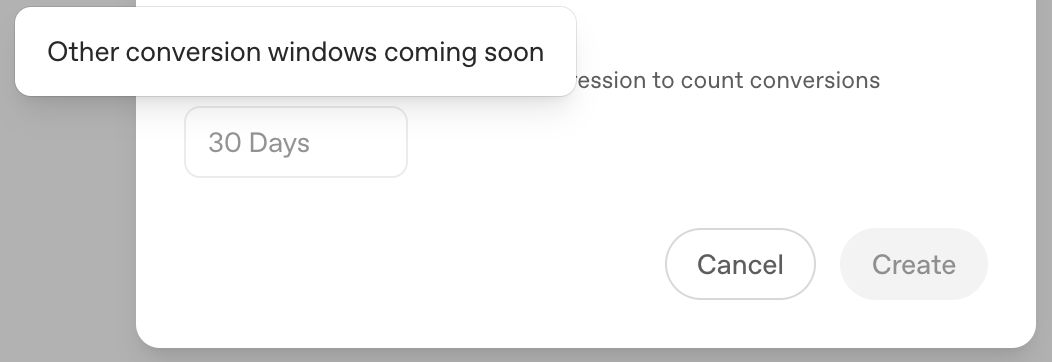
Conversion window
Currently locked at 30 days in beta with no option to change it. Additional windows are coming. This means your attribution data will give ChatGPT Ads credit for longer sales cycles whether that's accurate or not. Important context when reporting to clients.
Now let's build.
Step 1: Get Your Prerequisites Together Before You Open Ads Manager
Best practice: Treat this like a pre-flight checklist. Missing any of these will stall your setup mid-build.
The most common reason first campaigns take twice as long to launch is showing up to the platform without everything ready. Here's exactly what you need:
- A working OpenAI account tied to a business email
- Business name, address, and tax ID for account verification
- A credit card and invoice delivery email
- Your client's favicon — their brand logo sized for the ad unit
- A landing page that matches what you're advertising. Generic homepages fail review. The page needs to speak directly to the intent of the conversation your ad will appear in
- 3 ad variations ready — headline, description, and image for each
- UTM parameter conventions decided before you build, not after
- Your robots.txt checked — more on this in Step 6
Account verification is manual and can take days to weeks. Your ads can start serving before verification is complete, but OpenAI will flag it with a warning banner and campaigns will go dark if you don't finish it. Complete it immediately, or flag it to your client to handle on day one — don't let it sit.

Step 2: Create Your Account
Best practice: Use a business email, not a personal one. If you're an agency managing multiple clients, each client needs their own OpenAI account and their own Ads Manager.
Go to ads.openai.com. Sign in with an OpenAI account, complete your business entity details, tax ID, and billing information.
A few things worth knowing about account structure:
- There is no MCC-style manager account yet (like Google's). Each client account is separate and requires individual login
- Billing is tied to the account — make sure your client's payment method is on file, not yours
- The platform currently supports US-based advertisers targeting the US, Canada, Australia, and New Zealand. Broader market availability is rolling out through 2026
Once you're in, you'll land in the Ads Manager dashboard. Don't build anything yet — read Step 3 first.
Step 3: Understand the Campaign Structure Before You Build
Best practice: Map your campaign structure on paper before you touch the platform. Changing objectives after launch isn't possible, you'll have to rebuild.
The three-level hierarchy is the same as Google and Meta:
Campaign → defines your objective, total daily budget, start and end dates, geo targeting, and conversion event. One campaign = one business goal.
Ad Group → sits inside a campaign and defines a specific intent cluster. This is where your context hints live. One ad group = one theme or audience situation. More on this in Step 5.
Ad → the creative the user sees. Headline, description, image, and URL. You want a minimum of three variations per ad group, and we'll explain exactly why in Step 7.
The most important thing to know at this stage: your campaign objective is locked at creation. You cannot switch between CPM and CPC after launch. If you want to test both, build separate campaigns. Choose wrong here and you're rebuilding from scratch.
- CPC (Clicks objective) — pay per click. Best for lead generation and direct response. Start here for most client campaigns.
- CPM (Reach objective) — pay per thousand impressions. Best for brand awareness plays.
- Conversions — coming soon.

Step 4: Configure Your Campaign Settings
Best practice: Start with one market, one objective, and a conservative daily budget. Clean signal matters more than scale in the first 30 days.
Here's every field you'll encounter and what to do with each one.
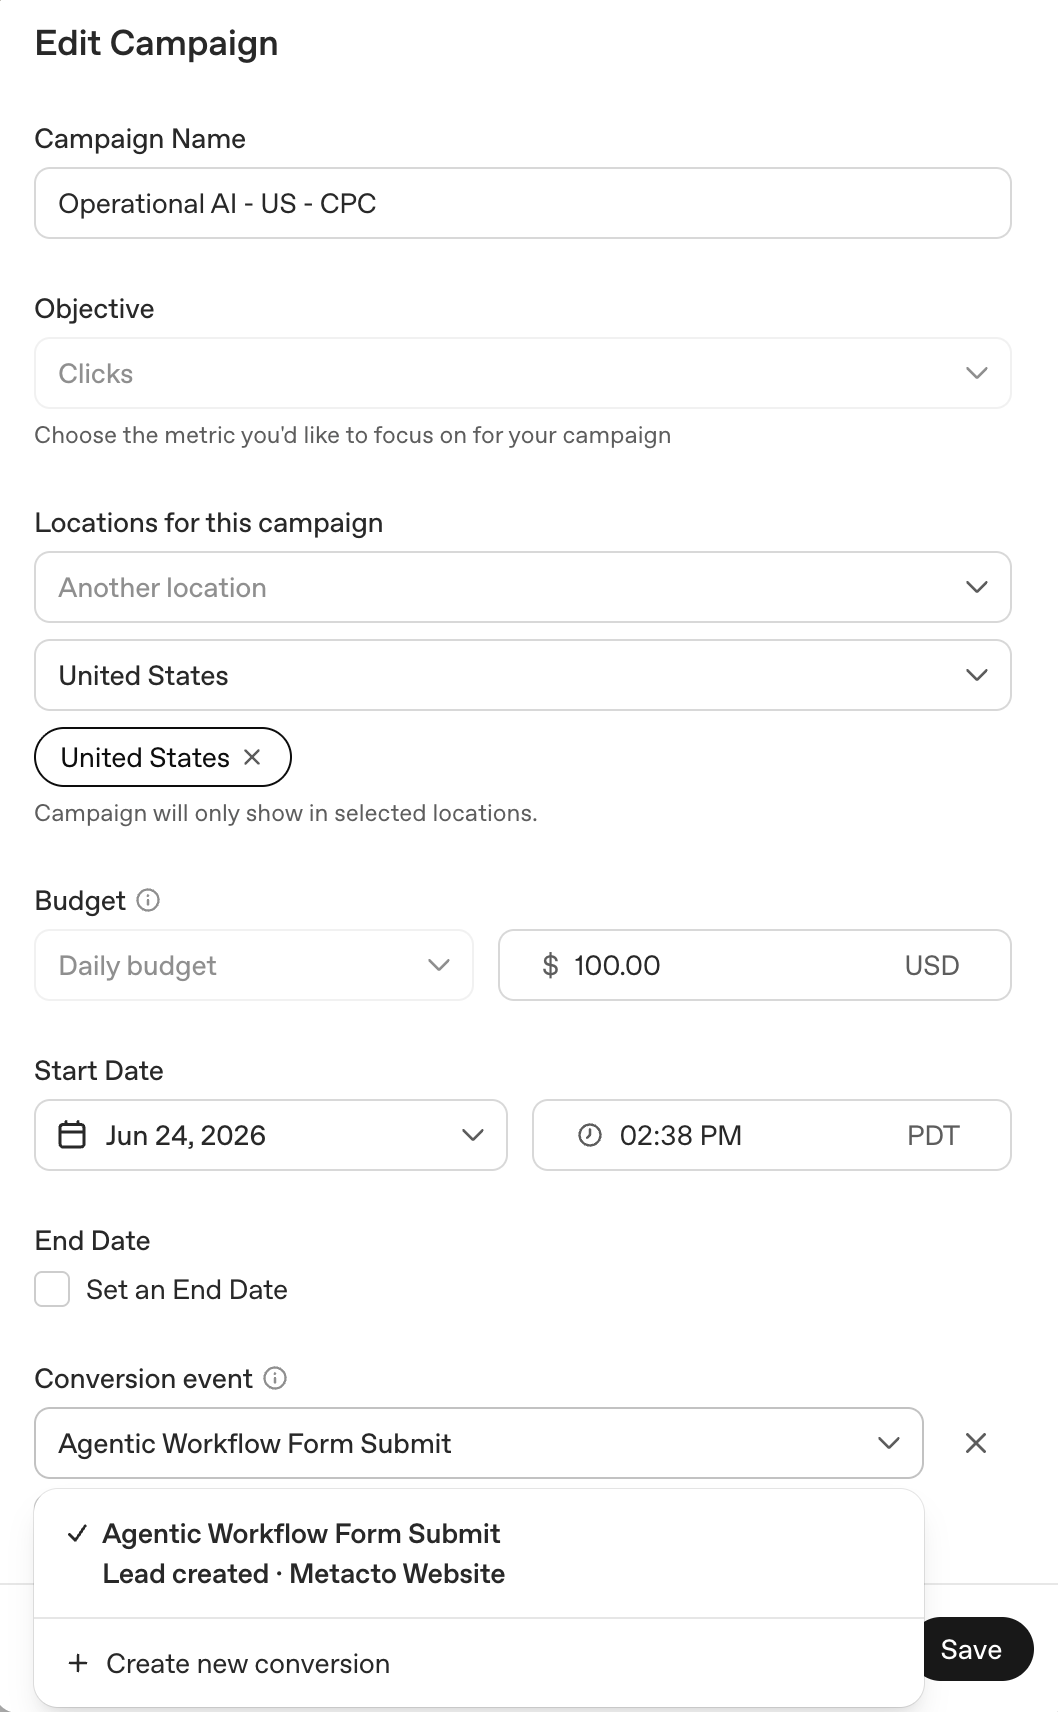
Campaign Name: Build a naming convention before you name anything. We use: Campaign Theme - Market - Objective. For Metacto our first campaign is: Operational AI - US - CPC. Future you will thank you when you're managing multiple campaigns and can tell them apart at a glance.
Campaign Type: You'll choose between Standard or Product Feed. Standard is what most campaigns will use. You write your own ads, set your own context hints, and control the creative. Product Feed campaigns pull from a catalog you upload and auto-generate ads per SKU, which is designed for retailers running ads across a large product inventory. For service businesses and B2B, Standard is your choice.

Objective: CPC for performance, CPM for awareness. Pick one. Conversions is coming soon and worth watching.
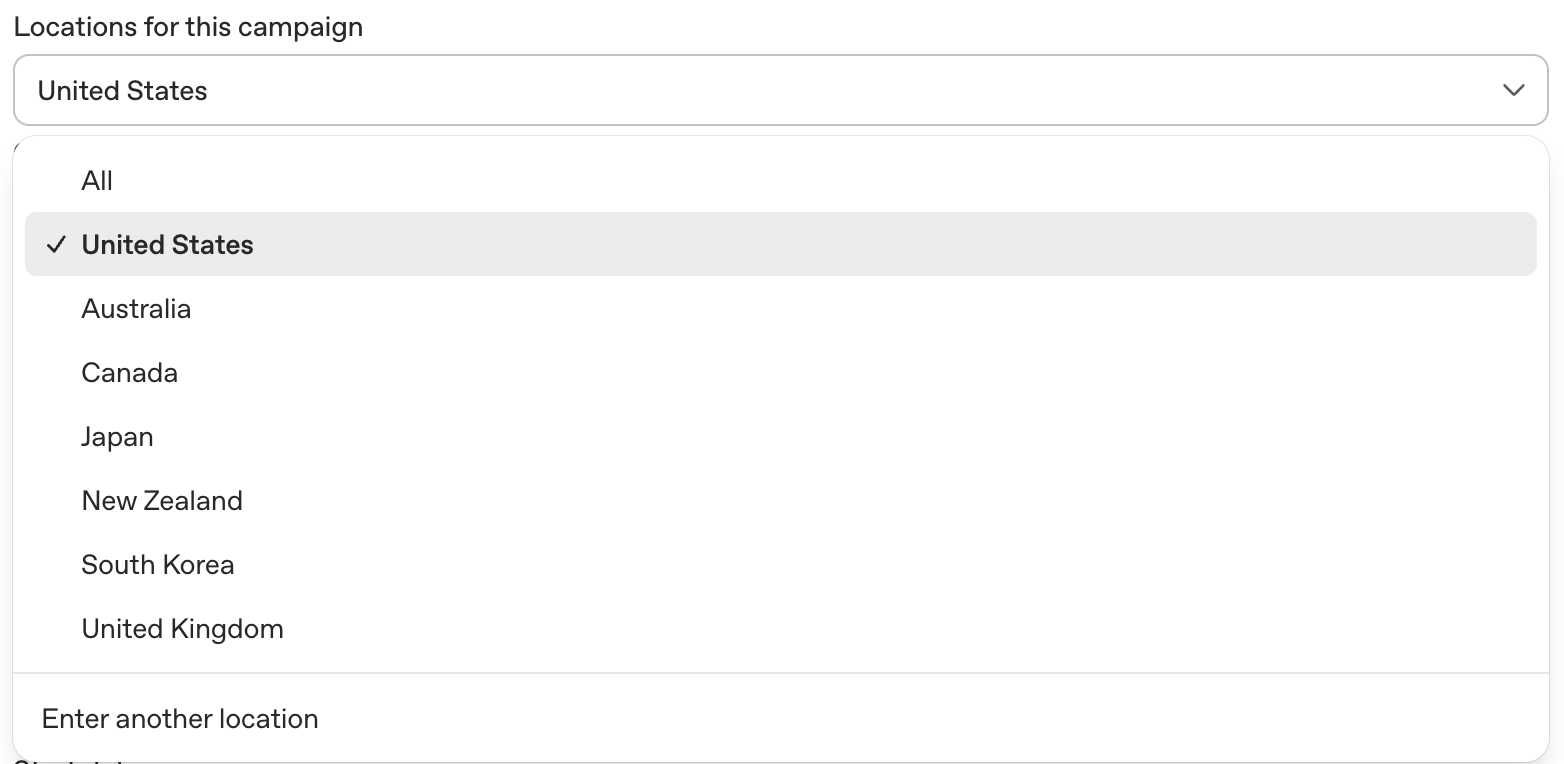
Locations for this campaign: The platform currently gives you preset options: United States, Australia, Canada, Japan, New Zealand, South Korea, and United Kingdom. There is also an "Enter another location" option at the bottom that opens a dropdown where you can select by Region or DMA. Worth knowing: it does not get more granular than that. If you try to target a specific city or zip code, the platform won't go there. For your first campaign, start with one country and get a clean signal before expanding. If you want to run in multiple markets, put them in separate campaigns so you can see performance by market clearly.
Budget: OpenAI recommends a minimum of $250/day for CPC campaigns to generate enough data for optimization. A practical testing floor is $50–$100/day if budget is tight — just know it will take longer to exit the learning period. You can set a daily budget or a campaign total budget. We recommend daily so you stay in control and can adjust as you learn. Monitor spend daily in the first two weeks.

Conversion Event (optional, but not really): The platform marks this as optional. It is not optional. This is what tells the platform what you're actually trying to achieve. You can come back and add it after you set up your conversion tracking in Step 8, which is exactly what we recommend. Set up your pixel and conversion event first, then come back here and link it.
Dates: YOLO, we set a start date for when we create the ad. It does go through an ad review and will launch then. There's an option to choose an end date, which we don't recommend. Let the campaign run and check on it daily to see performance.
Step 5: Build Your Ad Groups and Write Context Hints
Best practice: This is the single highest-leverage decision you'll make in the entire setup. Invest more time here than anywhere else.
Each ad group has three fields to fill out:
Ad Group Name, CPC Bid, and Context Hints. There is also a Default URL field — this is not your ad's landing page. The landing page URL lives at the ad level in Step 7. The Default URL is a fallback that the ad group uses if no URL is specified at the ad level. In practice, always specify the URL at the ad level with your UTM parameters attached, and this field becomes a backup.
The B2B budget reality: If you're running B2B campaigns, budget for $8–$15 CPC and watch thin ad groups that can spike to $20–$30. The audience is smaller and more valuable, so costs reflect that. For Metacto, we started at $10 CPC max bid.
Ad Group Name: Name it for the intent cluster it represents. For Metacto's first campaign we used: AI Workflow Automation. Clear, specific, easy to read in reporting.
CPC Bid: If you're running B2B campaigns, budget for $8–$15 CPC and watch thin ad groups that can spike to $20–$30. The audience is smaller and more valuable, and costs reflect that. For Metacto, we started at a $10 CPC max bid.
Context Hints — the most important thing you'll do in this entire setup: OpenAI marks context hints as optional. We strongly disagree. Without them you're handing the platform a topic category and a landing page and asking it to guess which conversations your ad belongs in. Context hints are how you tell the system exactly where to show up. Write them.

Here's what makes context hints different from everything you've done in search: there are no keywords. Instead, you write plain-language descriptions of the types of conversations where your ad should appear. You're describing a user situation, not a search term.
Wrong approach (keyword thinking):
- "AI workflow automation"
- "agentic AI software"
- "business process automation"
Right approach (context hint thinking):
- "A founder or technical lead who has tried an AI demo or chatbot but can't figure out how to turn it into something that actually runs in their business."
- "Someone researching what it takes to move from AI experimentation to a production AI workflow with real data, approvals, and measurable ROI."
- "A business owner or executive asking which of their workflows could be handled by AI agents and where the actual ROI would show up."
See the difference? You're describing the person and the moment, not the product.
How many context hints per ad group: Add all of them. 5 is a solid starting number. More hints give OpenAI's matching system more surface area to find relevant conversations. Think of it like adding more keywords to an ad group in Google.
Note: the platform does not currently display a character counter for context hints, so write them as full descriptive sentences and don't stress about length.
How many ad groups per campaign: One per distinct intent cluster. If the conversation a user is having, and therefore the ad creative that should match it, would be meaningfully different, that's a separate ad group. Don't mix intents in a single ad group.
Category mapping: Getting your topic category right is critical. Ads placed in the wrong category surface against irrelevant conversations. Done correctly, proper category mapping alone can improve performance by 20–40%.*
Step 6: Check robots.txt Before You Do Anything Else
Best practice: This is the easiest thing to miss and the most painful to discover after launch. Check it now.
Your landing page must allow OpenAI's crawlers or your ads will not serve — and you won't get a clear error message telling you why.
The two crawlers to whitelist:
- OAI-AdsBot
- OAI-SearchBot
Go to yourclientdomain.com/robots.txt right now and confirm neither is blocked. If your client uses a CMS like WordPress, Webflow, or Shopify, have their developer verify this before any spend goes live.
This is now a standard item on our pre-launch checklist for every ChatGPT Ads client.
Step 7: Create Your Ads
Best practice: Write for the conversation, not for a search results page. Test a minimum of 3 variations per ad group from day one.
Why three variations? Three ads in a single ad group gives the platform meaningful options to test without spreading budget too thin across too many variants. With fewer than three, you're not learning much, you're just running one ad with slightly different words. With more than five or six in the early stages, you're diluting the data and making it harder to reach statistical significance on any single variant. Three to five is the sweet spot. One is never enough.
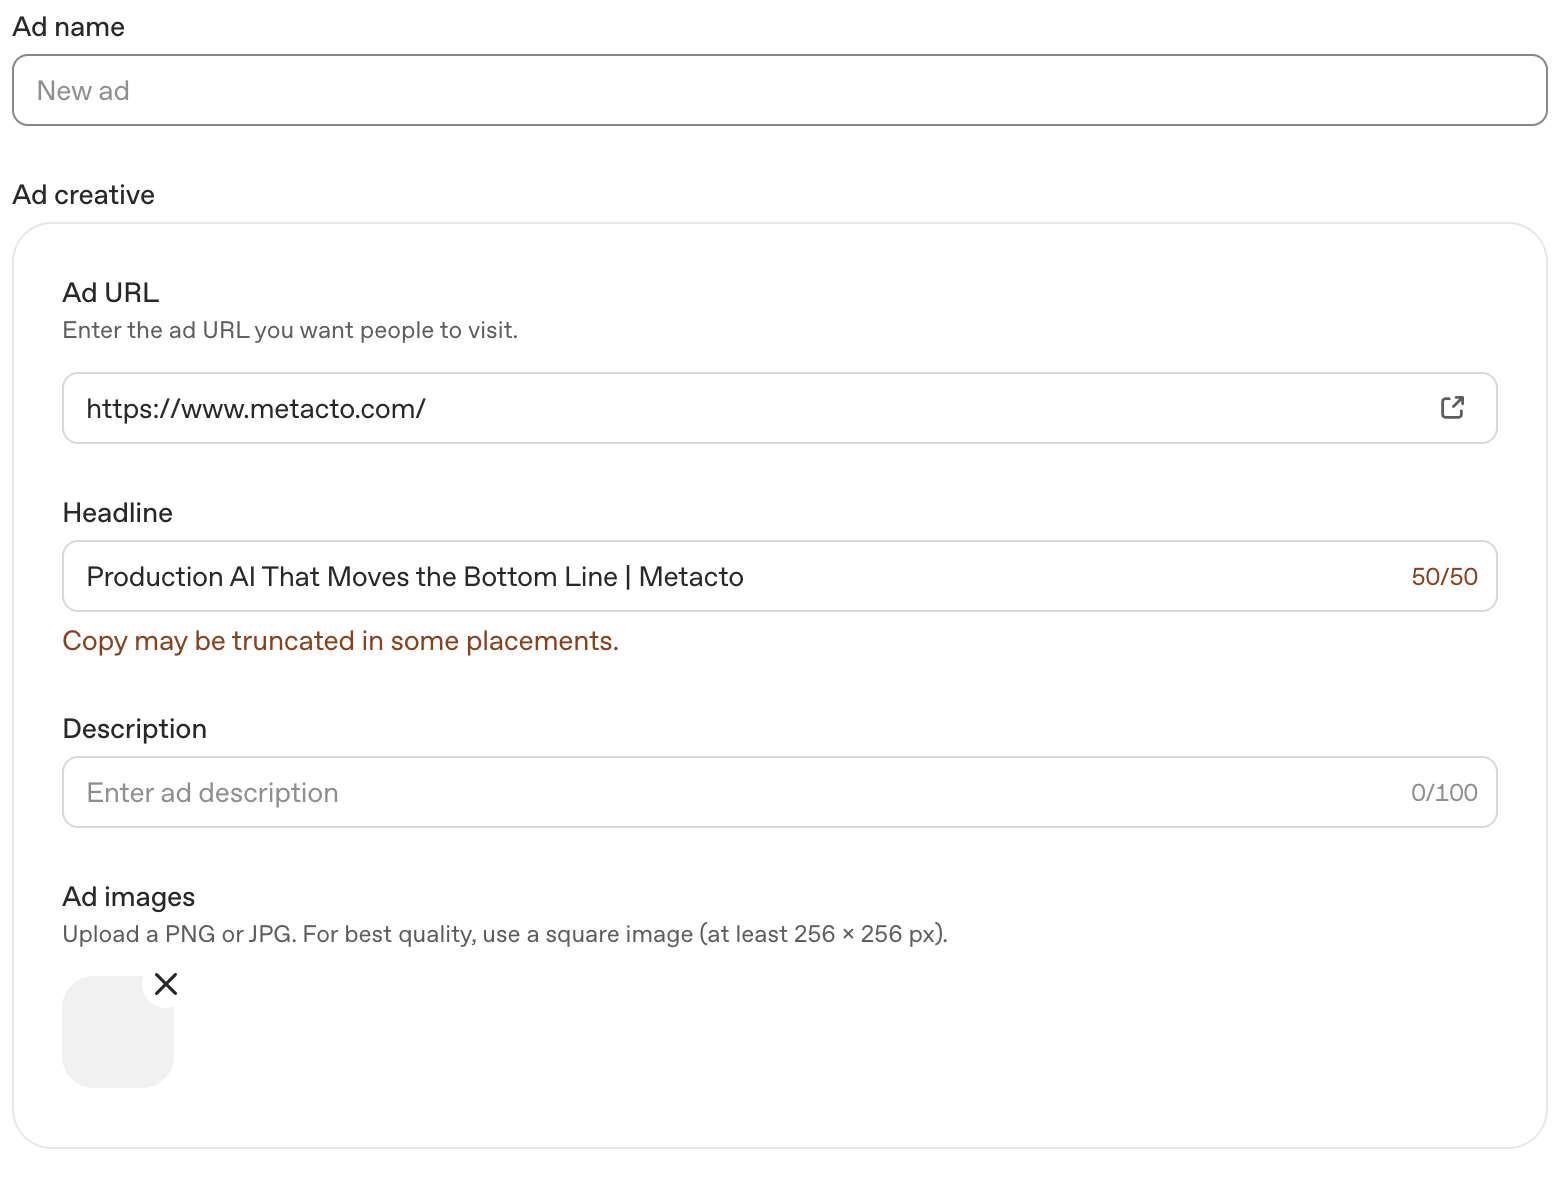
One more thing before you start writing: the platform auto-fills the headline field with a default placeholder. It is easy to miss. Clear it out and write your own before you submit.
Quick note on naming: When we set up this campaign, the field was labeled "Title." By the time you read this it may say "Headline." OpenAI switched the nomenclature within 24 hours of us setting up our first campaign. This is a beta platform that is actively being built out. Expect things to change and always verify field names in the platform at time of setup.
Current specs (verify in platform — these have shifted during beta):
- Headline: up to 50 characters
- Description: up to 100 characters
- Image: square (1:1), minimum 256×256px, JPG or PNG
- Required elements: Advertiser name, favicon, title, description, image, landing page URL
Headline best practices: 50 characters sounds like a lot until you try to write something meaningful. Every character counts. Write the title as if you're completing the thought the AI just started, not as a headline competing for attention on a SERP.
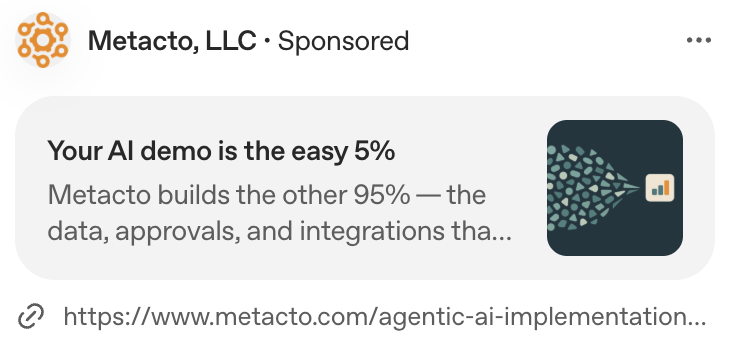
Good: Your AI demo is the easy 5% (27 chars). Less good: AI Workflow Automation Solutions (33 chars — generic, ad-speak).
Description best practices: 100 characters. Conversational. Specific. Connected directly to the context hint that triggered the ad. If your title hooks them, your description should feel like the natural next sentence.
Good: Metacto builds the other 95% — the data, approvals, and integrations that make agents reliable. (95 chars). Less good: We help businesses automate workflows with cutting-edge AI technology. (70 chars — vague, forgettable).
Image best practices: For B2B and technical audiences, go clean, dark, and minimal. Think a workflow diagram, a pipeline visual, or an abstract node-and-connection graphic. Avoid generic AI stock imagery, glowing brains, robot hands, people staring at holograms. Your audience has seen it a thousand times and it signals noise, not credibility. For your first campaign, keep the image consistent across all ad variations. You want to isolate copy as the variable you're testing. Once you know which copy angle wins, then you test image variations against it.
Ad naming convention: Name each ad to reflect the angle you're testing. variation-a_demo-to-production, variation-b_roi-angle, variation-c_pain-point. Makes reporting readable without having to open each ad to remember what it says.
UTMs: Use a different utm_content value for each ad variation. If all three share the same UTM string, you'll see ChatGPT traffic in your analytics but you won't know which ad drove it. That defeats the purpose of running variations. Update utm_content per variation before you submit.
Step 8: Set Up Conversion Tracking — Do This Before Any Spend Goes Live
Best practice: No pixel, no campaign. Platform-reported conversions are a leading indicator only. Your CRM or analytics platform is the truth layer.
Go to Tools → Conversions in Ads Manager. You'll work through four steps.
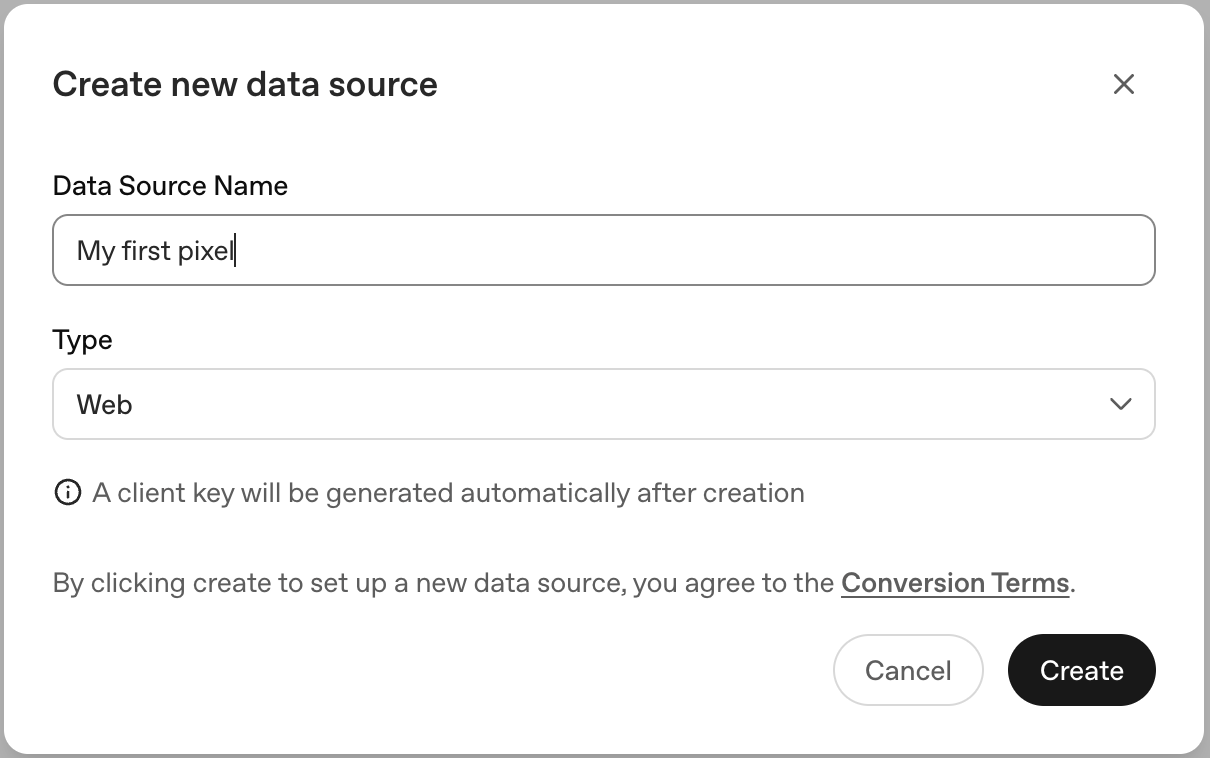
Step 1 — Data Source
This is where you create and install the OAIQ pixel: a small piece of tracking code that lives on your client's website and tells OpenAI what's happening after someone clicks your ad. Name it by client website, not by campaign. We used: Metacto Website. A data source can be shared across multiple campaigns for the same client, so name it for what it is, not what you're currently running.
When selecting the Type, you'll see three options: Web, iOS, and Android. iOS and Android app tracking are not available yet — they are coming in a future update. For now, select Web.
Once created, you'll get a pixel snippet. Send this to your client's developer with explicit instructions: this goes in the site header and fires on every page.
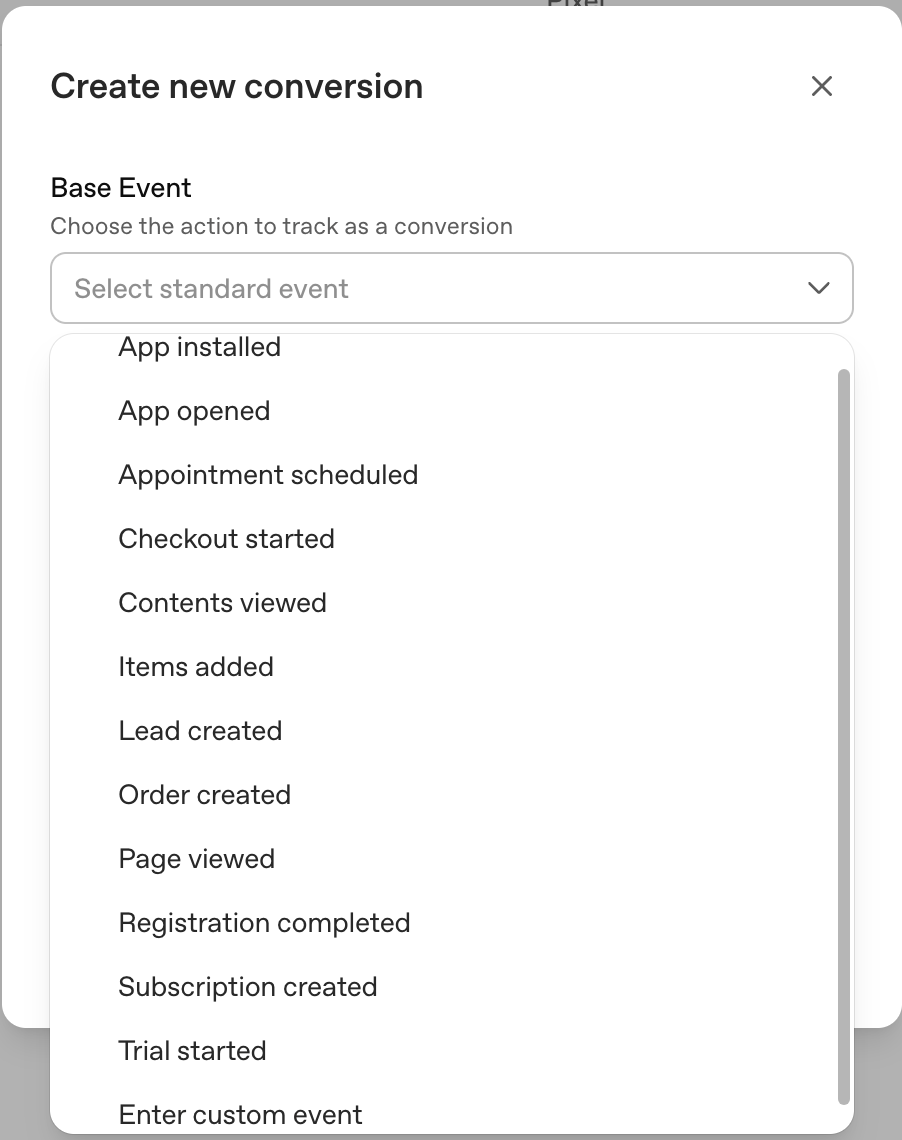
Step 2 — Conversion Events
This is where you define what actually counts as a conversion: the specific action you want to track and optimize toward. When you create a conversion event, you'll select a Base Event first. Here's what each option means:
- App Installed — tracks when a user installs your mobile app (for app campaigns)
- App Opened — tracks when a user opens your app after install
- Appointment Scheduled — tracks when a user books a meeting or consultation
- Checkout Started — tracks when a user begins the checkout process (ecomm)
- Contents Viewed — tracks when a user views a specific piece of content or product page
- Items Added — tracks when a user adds something to a cart (ecomm)
- Lead Created — tracks when a user submits a lead form or contact request. This is the right choice for most B2B and service campaigns
- Order Created — tracks when a purchase is completed (ecomm)
- Page Viewed — tracks when a user visits a specific page
- Registration Completed — tracks when a user completes a sign-up or registration
- Subscription Created — tracks when a user starts a paid subscription
- Trial Started — tracks when a user begins a free trial
- Enter Custom Event — lets you define your own event name if none of the above fit
For Metacto's campaign, we selected Lead Created — someone submitting the agentic workflow discovery form. Name it specifically. You have 30 characters: Agentic Workflow Form Submit. Connect it to your data source.
The conversion event code that gets generated here is different from the base pixel. This one fires only on the specific action, in our case, the thank you state after a form submission. Send this to your developer separately with a clear note: this fires on the form confirmation only, not on every page.
Conversion window: Currently locked at 30 days in beta. You cannot change this yet. OpenAI has flagged that additional windows are coming. For short sales cycle campaigns (ecomm, impulse purchases), this will overcount ChatGPT's influence. For long-cycle B2B, 30 days may actually be too short. Track this as the platform matures and adjust your reporting commentary accordingly.
Step 3 — Event Stream
Once your developer installs both the pixel and the conversion event code, come here to verify everything is firing correctly. The Event Stream shows you a live feed of pixel activity on the site. To test it, visit the landing page yourself and submit the form. You should see the event appear in the stream within a few minutes. Don't move forward until you see it fire.
Step 4 — Conversions API
When generating your conversion event code, you'll see the option to toggle between Pixel and Conversions API. The CAPI version sends conversion data directly from your server to OpenAI, rather than relying on a browser-side pixel. This matters because browser-based tracking can get blocked by ad blockers, privacy settings, or iOS restrictions. Server-side tracking fires regardless. Send both versions to your developer, the pixel for browser-side tracking, the CAPI for server-side backup. For B2B campaigns where every lead counts, this is worth the extra implementation step.
UTM setup: Tag every click with a consistent UTM scheme:
- utm_source=chatgpt
- utm_medium=cpc (or cpm)
- utm_campaign= your campaign name
- utm_content= your ad variation identifier
UTMs are how you connect the click to the result on your analytics side. Whether you're using GA4, HubSpot, or another CRM, the UTM string is what tells your platform where the traffic came from. Set up a view or report filtered to utm_source=chatgpt before launch so you can see ChatGPT traffic, time on site, and conversions in isolation. This is your source of truth alongside Ads Manager, not a replacement for it, but a critical second layer of confirmation.
Step 9: Link Your Conversion Event to Your Campaign
Best practice: An unlinked conversion event means your campaign has no optimization signal. Complete this step before launch.
Once your pixel is installed and verified firing, go back into your campaign and link the conversion event to it. In Ads Manager, this is Step 4 in the conversion tracking setup flow. You'll see it as "Link event to a campaign" once your first three steps are complete.
This is what tells the platform what to optimize toward. Without it, you're paying for clicks with no signal guiding delivery. The campaign will serve, but it won't improve.
Step 10: Launch, Then Monitor Smart
Best practice: Check in daily. React to problems, not to early performance numbers.
You're ready to launch. Here's what to watch and when.
Days 1–2: Ad review. Expect up to 24 hours for approval. If you're getting rejected, the most common reasons are landing page mismatch (your page doesn't reflect what the ad promises), robots.txt blocking crawlers, or a policy violation in the ad copy or image.
Days 3–7: Impressions start serving. Check in daily but only look for health signals: are impressions serving, is spend pacing, are there any disapprovals? Zero impressions after 48 hours post-approval signals a problem with category mapping, a bid that's too low, or an ad that didn't actually get approved. Don't touch bids or copy yet.
Days 7–21: Learning period. The platform is calibrating. Data during this window is noisy and often not representative of where performance will land. Keep checking daily for health. Hold off on optimization decisions. If a client asks for results at day 10, this is why you set expectations before launch, not after they ask.
Day 21+: Now you have a signal worth acting on. Here's what to look at and where to find it. In Ads Manager, reporting is available at three levels:
- Campaigns: Status, Type, Impressions, Clicks, Conversions, Spend, CTR, Avg CPC, Avg CPM, Budget, Start Date, End Date
- Ad Groups: Status, Spend, Impressions, Clicks, Conversions, CTR, Avg CPC, Avg CPM, Context Hints, Billing Event
- Ads: Status, Impressions, Clicks, Conversions, Spend, CTR, Avg CPC, Avg CPM, URL, Ad Group
At the Ad Group level, you can see which context hints are generating impressions. This tells you which conversations your ad is actually matching against. At the Ads level, you can see which creative variation is driving clicks and conversions.
The two questions to answer at day 21:
- Which context hint cluster is matching most often?
- Which creative angle is converting?
After day 30: Kill what's not working. Put the budget behind what is. Write your second round of creative using the winning angle as your control, and this time, test image variations against it.
Cross-reference everything in your analytics platform. GA4, HubSpot, or whatever CRM you're using, filter to utm_source=chatgpt and look at traffic quality, time on site, and conversion rate alongside the Ads Manager data.
The Pre-Launch Checklist
Before you hit go, run through this:
- Business verification initiated (client to complete)
- robots.txt verified — OAI-AdsBot and OAI-SearchBot allowed
- Landing page reviewed and passes policy check
- Pixel installed on all pages — verified firing in Event Stream
- Conversion event installed on thank you/confirmation page — verified firing
- Conversions API installed as server-side backup
- Conversion event linked to campaign
- UTMs on all ad variations with unique utm_content per variation
- Minimum 3 ad variations per ad group
- Client expectations set on learning period
One More Thing
We're running this for a real client right now. Metacto — an AI product engineering firm helping companies move from AI experimentation to production systems — is our first ChatGPT Ads client. We'll be sharing what we learn as the campaign matures.
If you're a PPC pro setting this up for the first time and you hit something we didn't cover, reach out. This channel is new enough that we're all learning together.
And if you're a business owner reading this thinking "I don't want to figure all of this out myself" — that's exactly what we're here for.
* Data sourced from third-party research and industry reporting: OpenAI Help Center (2026), ScaleWise (April 2026), Syntermedia (June 2026), eSEOspace (2026), WebFX (2026), Barefoot Performance Marketing (June 2026), StackAdapt (June 2026). All benchmarks reflect early platform data and are subject to change as the channel matures. Verify all platform specifications in OpenAI Ads Manager at time of setup — specs have shifted during beta and will continue to evolve.